

My Combo for Sleek Edges - EDGI Brush + ORS Olive Oil Edge Control
Edge Control Wednesday, December 19, 2018
Rarely, do I reach for hair gel when I have ORS Olive Oil Edge Control on hand. I’ve been using this edge control for years and not only does it provide great hold and sleekness to my edges but it’s super moisturizing at the same time. Recently, ORS added Sweet Almond Oil to the formula and I believe it’s the secret as to why it doesn’t dry out the hair. No dryness No stiffness!! Period. Too, it doesn’t leave any flakes or white residue behind which is super important when you want to rock your style all day long.


Since I got my EDGI Brush, I just love using it because the bristles are soft and gentle for my delicate hairline (I use it on my baby girl too!), product does not buildup in the bristles over time, plus it comes with a cute sleeper bag for protection and travel. I think it’s a nice change from the typical and gets the job done easily.
The binchotan charcoal bristles reduce bacteria growth, breakouts etc. I love the fact that the bristles are dark so that it won’t display product build up, make-up etc. Let’s face it, my MAC foundation used to get all over my toothbrush making it appear brown and dirty overtime. It was so annoying and kinda embarrassing LOL.

Top Knot + Hair Jewelry Protective Style Video Ft. EDGI Edge Control Brush + ORS Olive Oil Edge Control
Visit: DollBaby.com to Purchase
Do you use edge control or gel to sculpt your edges/hairline?

Hey guys!! So I'm back with another video, this time I'm sharing with you exactly how I achieve my super defined braidout on 11/12 week post relaxed hair. A few weeks ago I shared a photo of my braid out on Instagram (@hairlicious) for "TEXTURETUESDAY and several of followers asked for a video tutorial showing how I achieved this look. So here we are!
Braidouts are my favourite low manipulation style to do while stretching and they are super easy to do! I'll typically do my braidouts on air dried hair after my mid week wash day routine i.e. Thursday. I'll rock my braid out until the next wash day i.e. Sunday.
To preserve my style for 3-4 days, I do the "Pineapple Method" where I gather my hair into a high ponytail, instead I do a secure top bun and wrap my hairline with my satin scarf. I also moisturize daily but using a tiny amount of my Leave-in Hair Milk and I'll scrunch the product into my hair/ends, fluff and go!
COMMENT BELOW if you are a fan of Braidouts too!
♥Items/Products Mentioned:
1. Creme of Nature Argan Oil Buttermilk Leave-in Hair Milk
2. Creme of Nature Argan Oil Foaming Wrap Lotion
3. Creme of Nature Argan Oil Shine Mist
4. Perm rods (7)
5. Wide tooth comb
As always, thanks for watching! Oh, and don't forget to SUBSCRIBE :)
xoxo

I achieved this look with the help of just 2 products i.e. Care Free Curl Gold moisturizer and my Jojoba oil as a sealant. I applied the products on damp co-washed hair and I co-washed with Pantene Relaxed Moisturizing Conditioner. Very simple!
I chose Care Free Curl Gold because it locks in moisture, helps to detangle my strands and it gives my waves a nice shine/sheen. My waves don't revert or frizz. I love how it goes me that wet n wavy look. I typically get 2-3 day hair by putting my hair in a "pineapple" at night. Low manipulation is key!
Sometimes I'll wear it down with accessories, other times I wear it half up half down or with a top knot!
Check out my video on how I achieved these looks:

Hey Hairlistas!
In this video I share with you how I "dress up" my old flat ironed hair. In the video my hair was 7 days post flat iron. Usually around 5-7 days my flat ironed hair tends to look a bit dull. Adding these cute accessories and a simple flat twist adds life to my hair allowing me to stretch-out my flat ironed style a bit longer.
Thanks for watching!!
Items/Products Mentioned:
Goddess Hair/Head Chain: http://amzn.to/1NXPNtf
Two braids Black and Gold Headband: http://amzn.to/1UUOPDw
Hicks Total Transformation Edge Control: http://amzn.to/1NXQ27t
What styles do you like to do on old flat ironed hair? Do you like to wear hair accessories?
Video: Irresistible Me Clip In Hair Extensions Install + Review
Flat Ironed Hair Saturday, December 12, 2015

The lovely people over at Irresistible Me sent me these hair extensions to "test run" and see if I liked them. Truth be told, I've never worn clip in hair extensions before. I was slightly hesitant to try them out as the texture was silky and shiny, which is the opposite of my relaxed hair.
After installing the hair clip ins in my flat ironed hair (6 clip ins total), my initial thoughts and reservations quickly disappeared! I was so impressed at how well they blended in with my hair and how easy it was to install/remove.
Not to mention, the clip ins were tangle free and light weight - my hair didn't feel weighed down; however, it added extra body/fullness to my relaxed hair!
Here are the details on the hair:
- 100 % Royal Remy Human Hair
- 1B Natural Black
- 18" inches in length
- 200g of Thickness
Here are a few photos on the packaging and the difference sizes I used in my hair.


Check out my first impression video on my how I install them:
Discount Code: IrresistibleHairlicious
Visit: http://bit.ly/IM_Hair1505
Have you tried clip-ins before? Do you like them? Let me know your thoughts :)

My Wash Day Run-Down:
Pre-poo: I applied Extra Virgin Coconut Oil to my hair while dry. I left my pre-poo on for 20-30 minutes with a plastic cap.
Co-wash: Rinsed out the EVCO and grabbed my lovely Aussie Smooth conditioner to co-wash my roots/hair. Love this stuff - it's truly moisturizing and detangling!!!
 Air dried: I t-shirt dried for 15-20 minutes until my hair was just slightly damp. I applied some Scurl No Drip Activator mixed with Creme of Nature Argan Oil Foaming Wrap Lotion to set my hair for increased definition in my braid-out. I sealed my hair with the Creme of Nature 100% Pure Argan Oil to lock in moisture. I then started to section off my hair in 5 sections and began to braid. I added perm rods to the ends of each braid. I air dried my hair overnight and removed my braids in the morning with a little bit of CON Pure Argan oil on my finger tips to prevent frizz.
Style: Since I'm freshly relaxed, braid-outs don't always come out looking 100% because I have no new growth. It can be a hit/miss. I opted for the half up top knot for a more chic trendy look, plus I was celebrating my birthday so I wanted something fun and cute :)
I gently used a boar bristle brush on my hairline and edges for smoothness. I secured the section with a ponytail holder and began to two-strand twist the remaining hair - wrapped it around & pinned it down! My hair felt so soft and smooth - just the perfect combination for a braid out :)
Results: My Birthday hair :)... out and about!

Until next wash day....
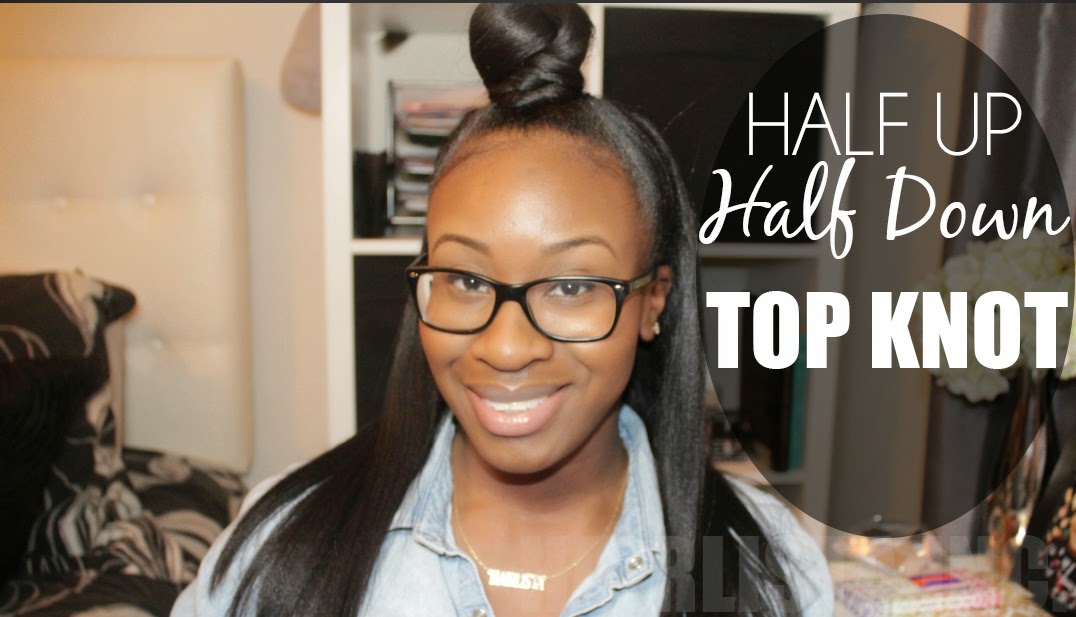
This highly requested video is now live! I still obsess over top knot styles because they are so easy to do and they look so trendy! It literally takes a couple minutes to achieve this look, not to mention, you only need a few products to do it.
Check out my video below & get the look!
Thanks for watching!
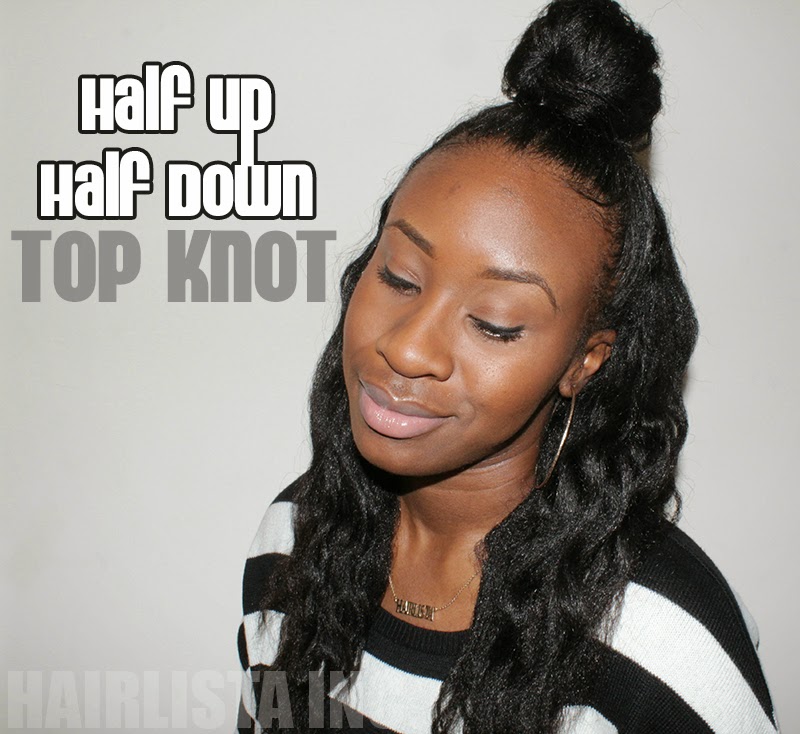
Lately, I've been obsessing over the Half Up-Half Down Top Knot! I just love how chic and playful this style is. It's perfect for hanging out with the girls, going out for lunch or just spending a Saturday at the mall. I love it!! Not to mention ... it's super easy to do!

To create my bun, I did my signature Top Knot method by splitting the ponytail in two and then two-strand twisting the hair all the way down to the ends. I wrap the twist around my ponytail holder and pin it down! That's it.
The back of my hair is wavy due to an old twist-out I was wearing. The waves really helped to enhance the overall look and texture of my hair. Prior to styling, I moisturized with Scurl No Drip Activator and I sealed with Extra virgin olive oil.
Are you a fan of the half up-half down Top Knot? Have you tried it?
![About [span]me[/span]](https://blogger.googleusercontent.com/img/b/R29vZ2xl/AVvXsEjYJ-OsqTpjwUx6WGVITW4ZgfpwWcy6ohcmxzywksod6SoNT833CkUghcABUDw6R5szEcgPNIy1G8Hz3TZDw_yvDpGTORLApguLMsj7oKRJufcX5-bwtMQWEBhtLb-vkx_kfMSMIuMsMp4/s1600/Untitled+design-6.png)


